How to Set Up Email on Mac Mail Tiger
Browse through the tutorial to set up your system of sending and receiving emails on MacOS Tiger.
In Mac Mail, select:
Mail / Preferences
- Click the ‘Accounts’ button on the top portion of the window.
- Click the ‘+’ button at the bottom left corner of the window to launch the Setup Assistant. This will help you create a new email account.
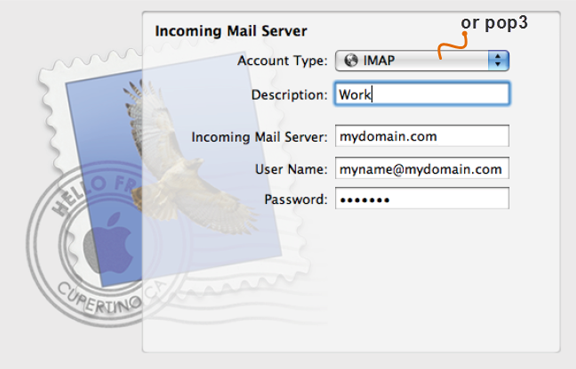
- Choose IMAP or POP3. Click the ‘Account Type’ drop-down menu.
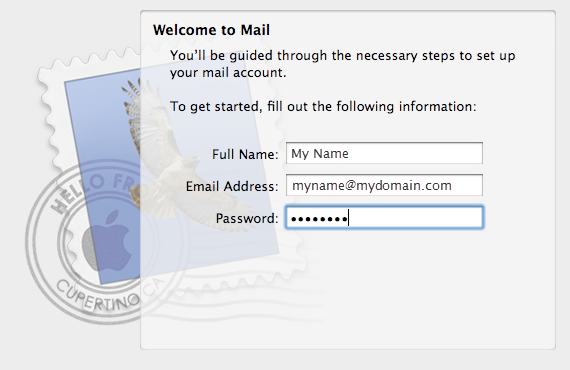
- Enter your name, email address and email account password.
Incoming mail server
- Incoming Mail Server: domain.com (should be pointed to us)
- User Name: Input your full email address (including @domain). Do not forget to use all lowercase letters
- Password: Input the password for your mail account
Mac Mail will check your address to ensure your settings are correct. If you receive an error and/or need to make some corrections, click ‘Go Back’. Click ‘Continue’ if everything is correct.
Outgoing mail server details
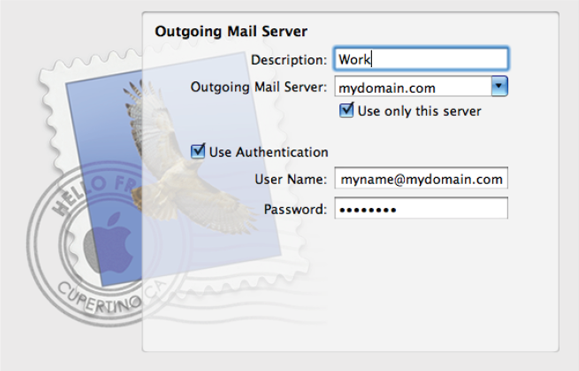
Input your domain name (‘mail.’ prefix can be omitted) in the Outgoing Mail Server field.
Check the ‘Use Authentication’ option.
- User Name: Full email account name including @domain (e.g. user@domain.com).
- Password: Input the password for your email account.
Press ‘Continue’ and Mac Mail will check the connection. The process can take several minutes.
Click ‘Go Back’ if you receive an error to check the server settings.
After finishing the setup process, you will find a window showing all your connections. Press the ‘Done’ button to complete the e-mail account setup.
Additional incoming mail server settings
Go to:
Mail > Preferences > Accounts > Choose an account
Press ‘Advanced’ in the right-hand section.
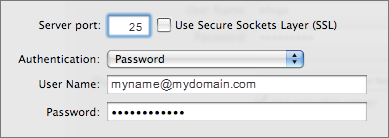
Please check if you have same settings as in the picture above.
IMAP: port 143
POP3: port 110
Additional outgoing mail server settings
For additional outgoing server settings, go to:
Mail > Preferences > Accounts > Choose an account
- Look for the Outgoing Mail Server (SMTP)in the dropdown menu at the right-hand section.
- Choose ‘Edit Server List’ from the dropdown menu.
- Press ‘Advanced’.


